Phoenix-area urban sawmill offering custom milling, CNC surfacing of slabs and tables, and locally salvaged desert hardwoods. Serving woodworkers across the East Valley.
Slide Away Table with Counterweights
When I had an opportunity to get the X-Carve from Inventables, it was a no brainer that I needed to go for the 1000mm version. Of course I needed the extra size for the large projects and of course I didn't consider the amount of space that would actually take up. After all of the boxes arrived and I was assembling the CNC, I started to get worried when it took up nearly the entirety of my kitchen table.Seeing how I barely have enough room in my shop for my current equipment, I started devising ways to make it fit before ever moving it in. After doing some research, I found many fold up tables like Steve Carmichael's Fold-Up Work Table among others but didn't want to take up more precious floor space than needed. At the time I had a decent amount of wall space and started envisioning a sliding table that would mount there. After carrying the contraption for the first time I added some counter weights to my plans to help move the enormous amount of weight. A few napkin drawings later and I had my rails, sliding & hinging mechanisms figured out.I assembled a basic table frame out of cheap maple so it would be strong enough to hold the almost hundred pounds of weight just the X-Carve had to offer. I then digitally designed all of the moving, sliding & hinging parts to be cut out using the X-Carve. I really didn't want to spend a large amount of money on this project so I looked around my shop and found various maple, plywood and aleppo pine cutoffs to be used.[one_half][/one_half][one_half_last][/one_half_last]I designed my swinging & sliding mechanism out of wood and electrical conduit and tried to reduce binding in the rails. I then used small wooden collars to lock everything into place. After breaking the first plywood collar when screwing it to the pipe I grabbed some aleppo pine and was pretty successful.[one_half][/one_half][one_half_last][/one_half_last]After assembling the table frame and putting some rails and the sliding/swinging/hinging mechanism together, I sanded and waxed the crap out of all moving parts. I tried to make my design to help prevent binding if one side came down a little faster than the other but to help reduce friction, I wanted everything sliding smooth.At this point I was starting to get excited watching my design come together and seeing things actually slide, swing and hinge. I bolted on some simple legs that were designed to collapse into the bottom of the table and installed some stop blocks on the rail that were just at the right height to stop the table at level. I looked around my shop again for enough scrap plywood to skin the top of the table and then used the X-Carve to put 6 recessed bolt holes into the waste board.[one_half][/one_half][one_half_last][/one_half_last]After mounting the XCarve to the slide away table, I needed to either mount the power supply and controller to the table or disconnect it all together. I decided to separate the two and add a longer cord to make it easier to keep my computer away from the vast amounts of dust this thing generates. I picked up a 24 pin connector on amazon (4 pins more than I needed.) and rewired the entire thing as well as install a cable sleeve to help keep everything together.[one_half][/one_half][one_half_last][/one_half_last]To assist in sliding this large weight up the wall I picked up two heavy pieces of steel, both weighing close to 30 pounds each. I figured that I didn't want them to weigh more than the XCarve but just wanted to offset the weight a little. To assist with the counterweight portion of this project I turned a couple of pulleys from scrap alder and made brackets from random stuff I had lying around. I wanted the pulleys to move freely inside the brackets so I used some brass tubes from pen kits as make shift bearings. After welding some tabs to the 30 pound weights they got cleaned up and waxed just like the rest of the things that had to slide or move.After tying heavy-duty nylon rope to the weights, winding it through the make shift pulleys and securing it to the sliding/tilting mechanism with a bowline knot, I found that I could barely even get the XCarve and table down half way. I took the weights back off and weighed everything verifying that the combined weight of the steel counterweights didn't even come close to the weight of the XCarve let alone XCarve and table. I figured I must have some friction and weird physics going on so I asked a neighbor to cut 1/3 of each weight of using his oxy acetylene torch. After re-assembly I found that it was still not enough and watched the weights get pulled into the rail's causing large amounts of resistance. I re-located the hooks on the weights to the inside corner and trimmed off another portion getting just enough to make the whole contraption work.Now that the entire project is done I can slide up the XCarve up and out of the way when not in use and put all of that floor space to good use. As an added bonus, when it's on the wall it is still highly visible and adds to the awesomeness of my shop. When I have a project that requires the CNC I simply need to slide the table down, pop out the legs and let it get to work.See the Slide Away Counterweight Table in its lowered position:Check out the Slide Away Counterweight Table in it's raised position:Would I call this project a success? Well.. I guess but I'm not really pleased with the overall outcome. It works but there's a lot of things screwed to my wall and it was a pretty involved project. I actually started this before I started growing a beard and let LOTS of projects get in the way. I also recently saw a simple folding wall mounted table the DIY Tyler put on his wall. It's simple, saves your floor space and works. If I were to re-do this project, I think I would choose DIY Tyler's route.


 I assembled a basic table frame out of cheap maple so it would be strong enough to hold the almost hundred pounds of weight just the X-Carve had to offer. I then digitally designed all of the moving, sliding & hinging parts to be cut out using the X-Carve. I really didn't want to spend a large amount of money on this project so I looked around my shop and found various maple, plywood and aleppo pine cutoffs to be used.[one_half]
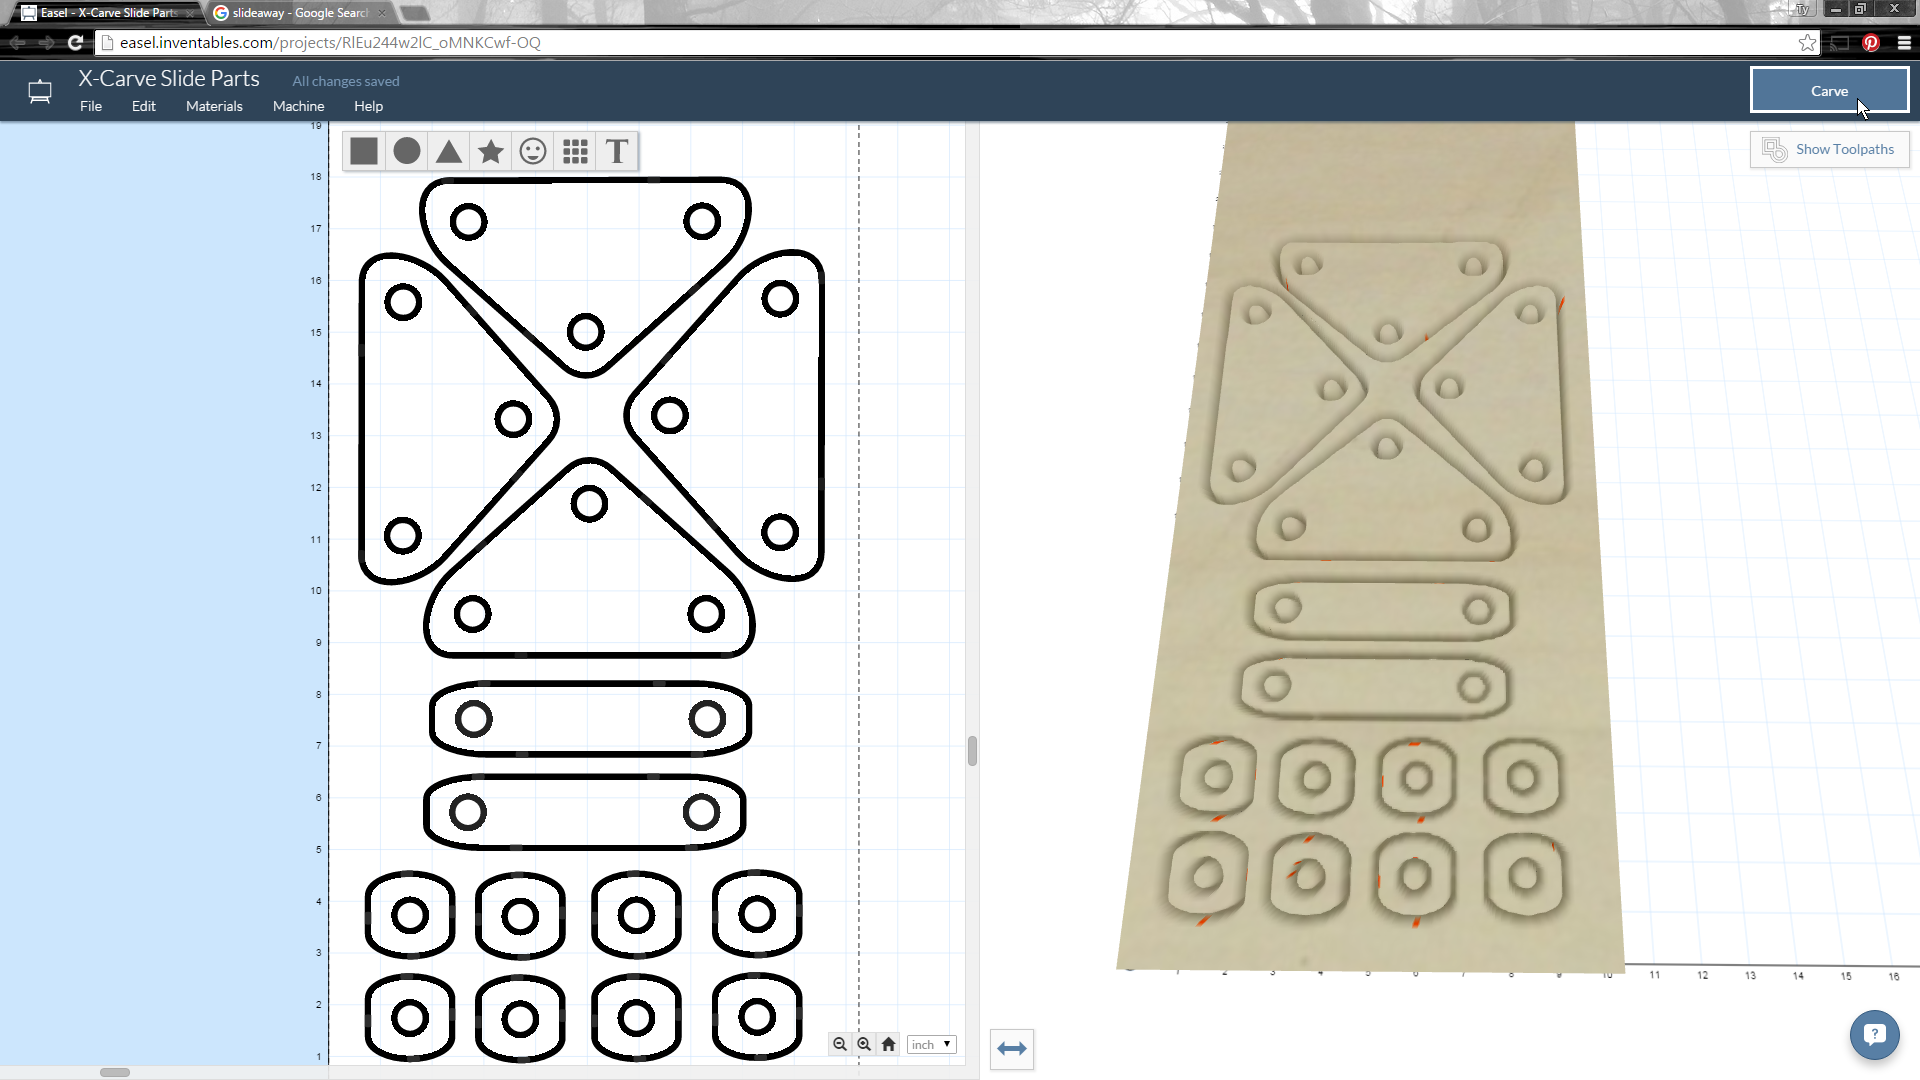 [/one_half][one_half_last]
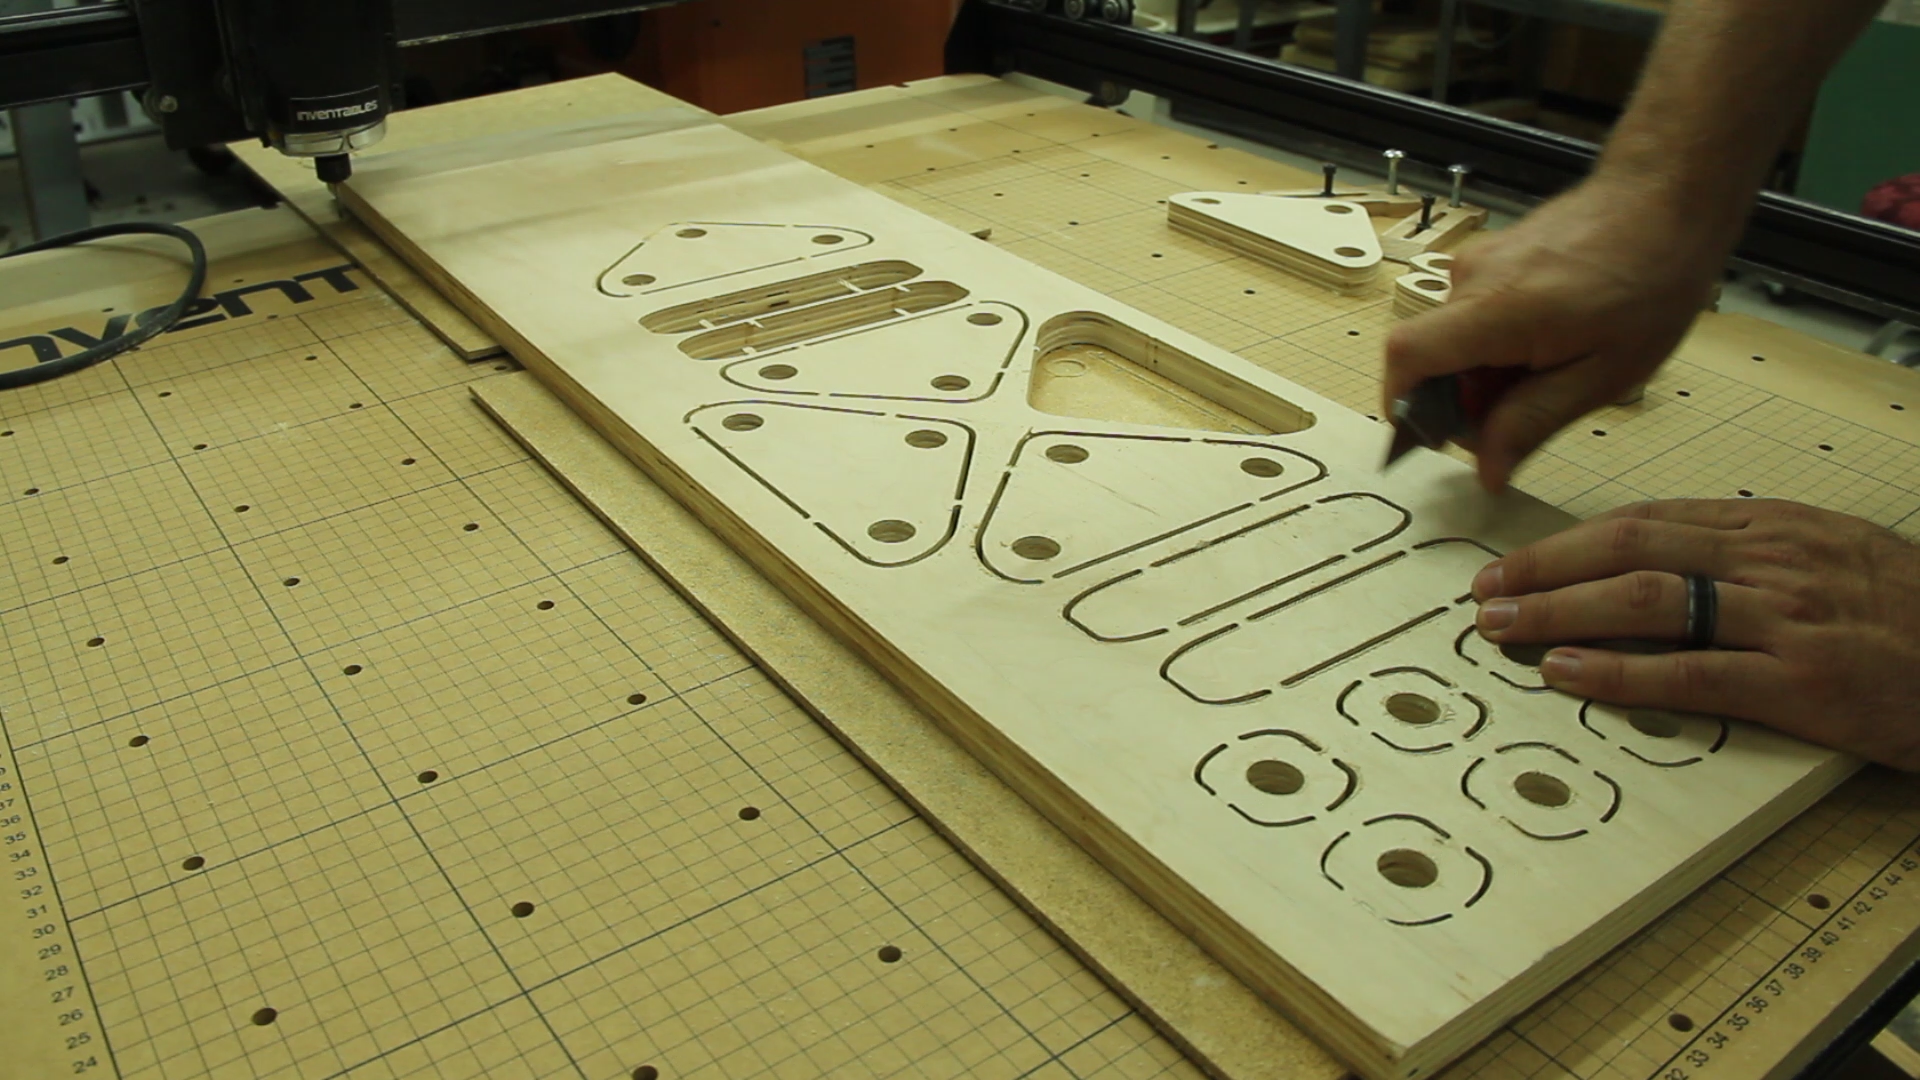 [/one_half_last]I designed my swinging & sliding mechanism out of wood and electrical conduit and tried to reduce binding in the rails. I then used small wooden collars to lock everything into place. After breaking the first plywood collar when screwing it to the pipe I grabbed some aleppo pine and was pretty successful.[one_half]
 [/one_half][one_half_last]
 [/one_half_last]
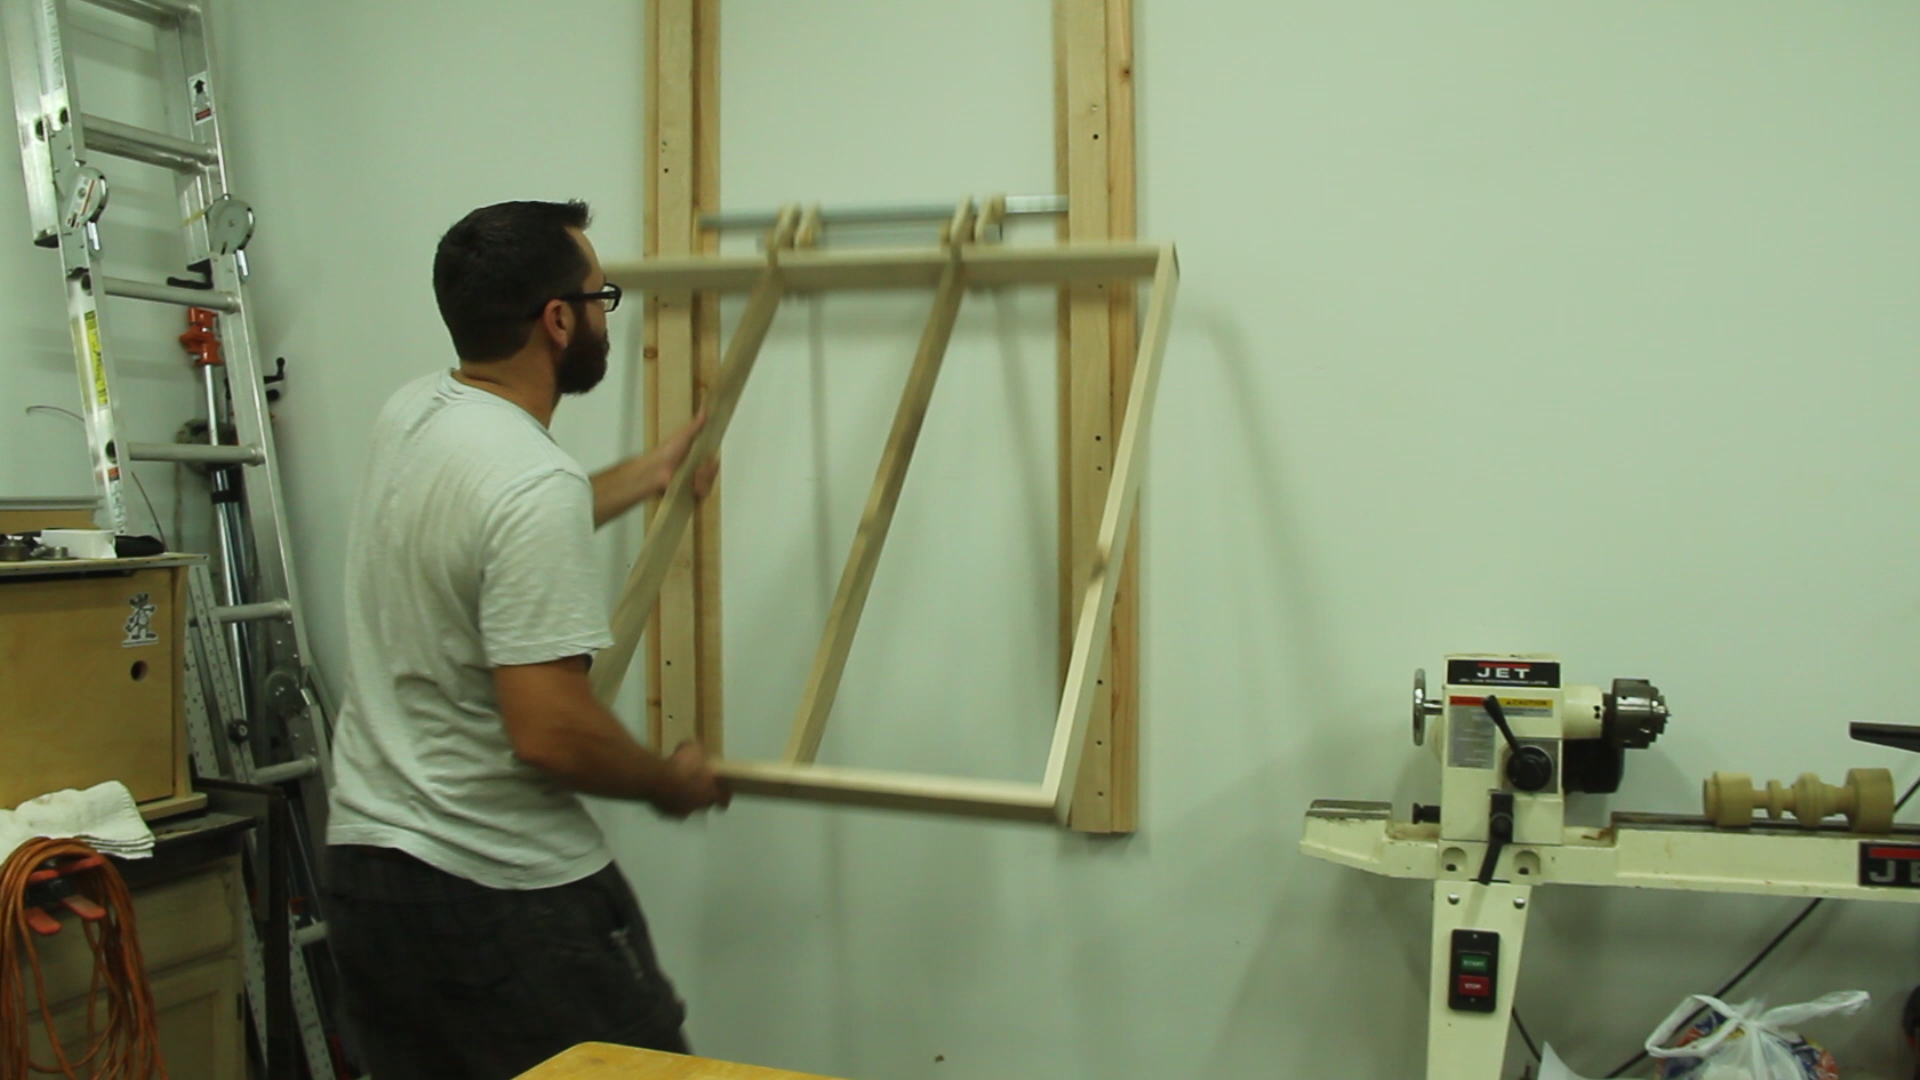 After assembling the table frame and putting some rails and the sliding/swinging/hinging mechanism together, I sanded and waxed the crap out of all moving parts. I tried to make my design to help prevent binding if one side came down a little faster than the other but to help reduce friction, I wanted everything sliding smooth.
 At this point I was starting to get excited watching my design come together and seeing things actually slide, swing and hinge. I bolted on some simple legs that were designed to collapse into the bottom of the table and installed some stop blocks on the rail that were just at the right height to stop the table at level. I looked around my shop again for enough scrap plywood to skin the top of the table and then used the X-Carve to put 6 recessed bolt holes into the waste board.[one_half]
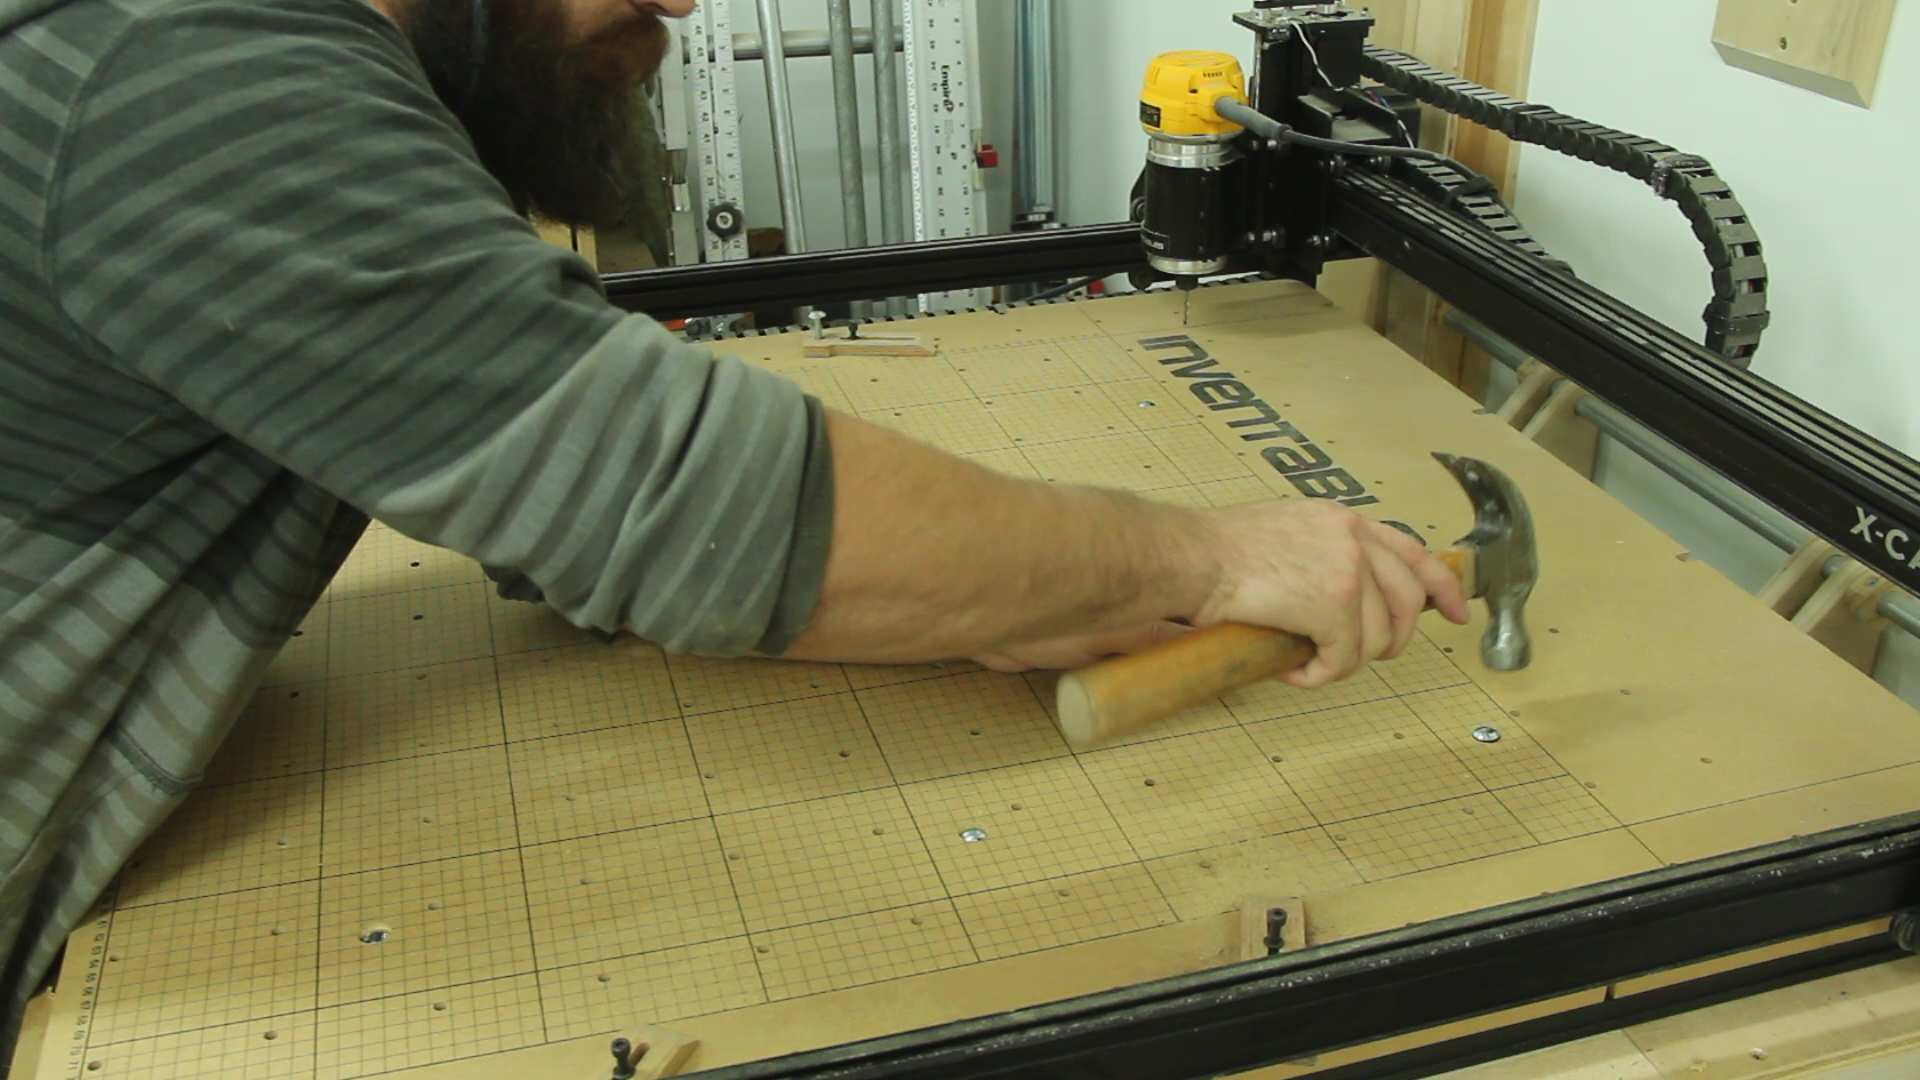 [/one_half][one_half_last]
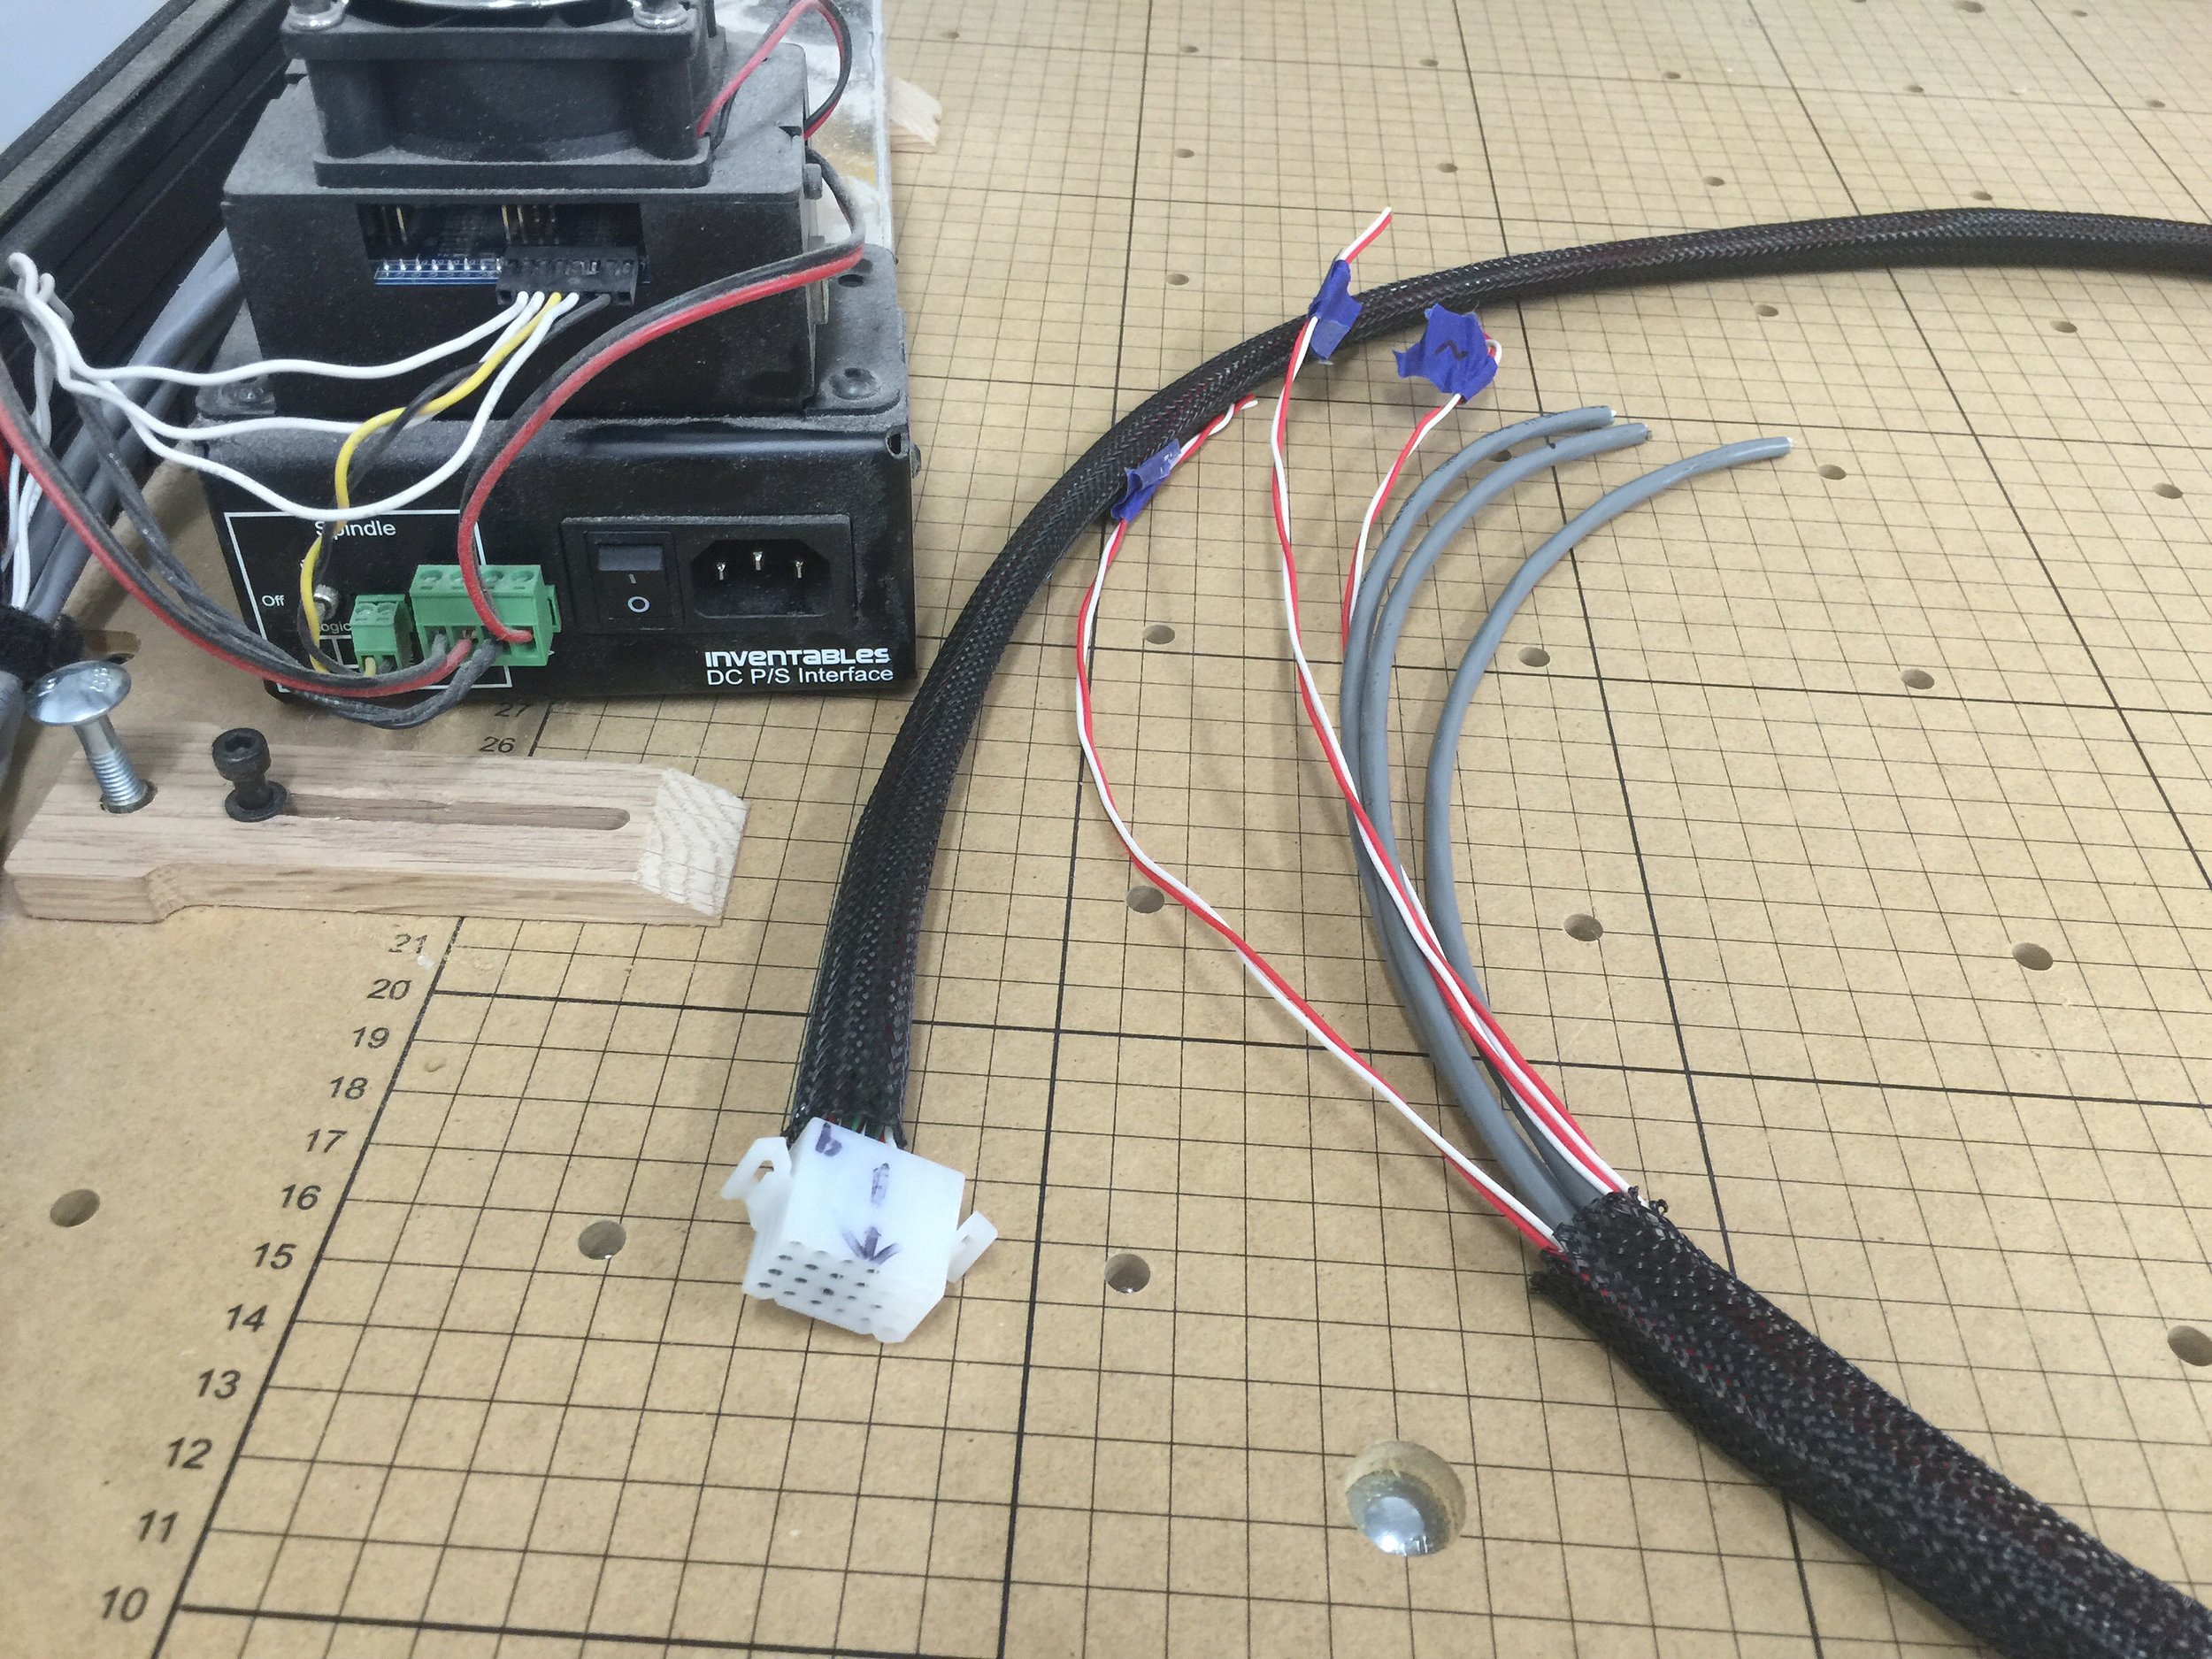 [/one_half_last]After mounting the XCarve to the slide away table, I needed to either mount the power supply and controller to the table or disconnect it all together. I decided to separate the two and add a longer cord to make it easier to keep my computer away from the vast amounts of dust this thing generates. I picked up a 24 pin connector on amazon (4 pins more than I needed.) and rewired the entire thing as well as install a cable sleeve to help keep everything together.[one_half]
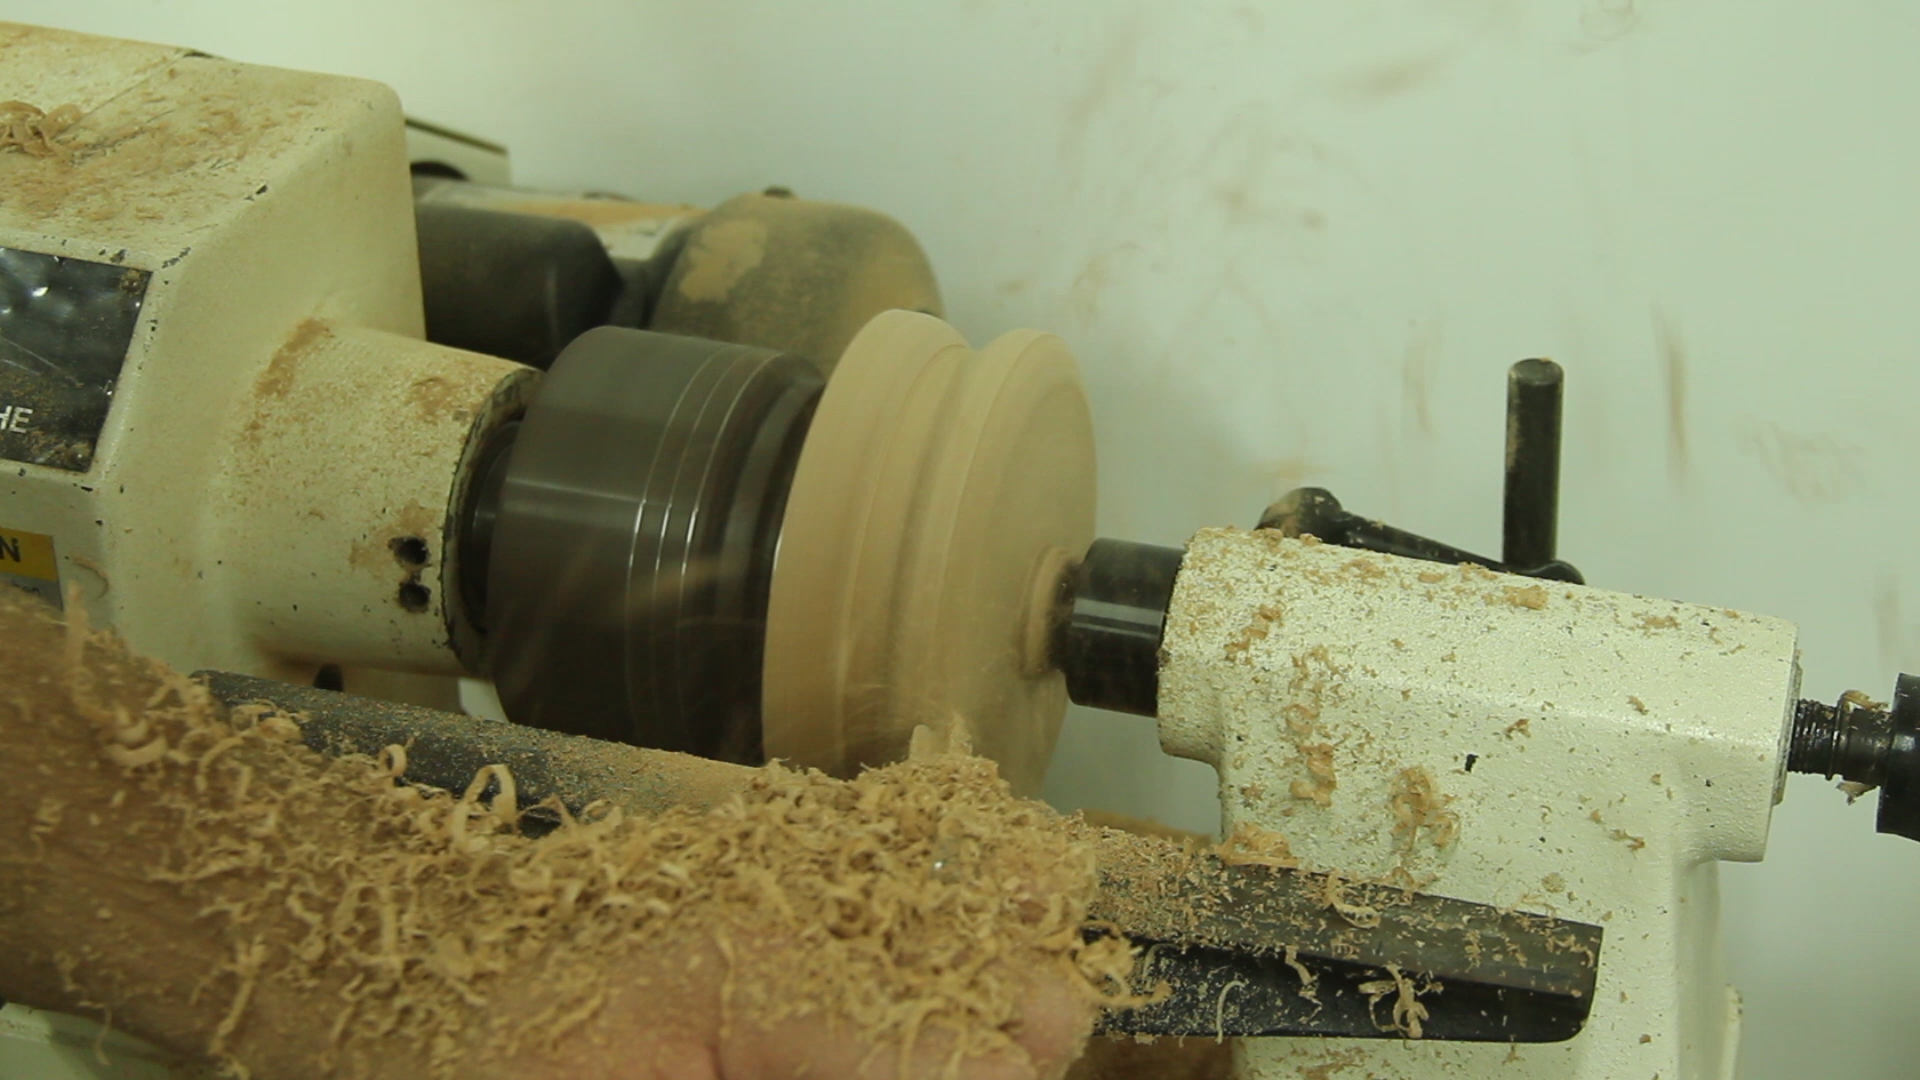 [/one_half][one_half_last]
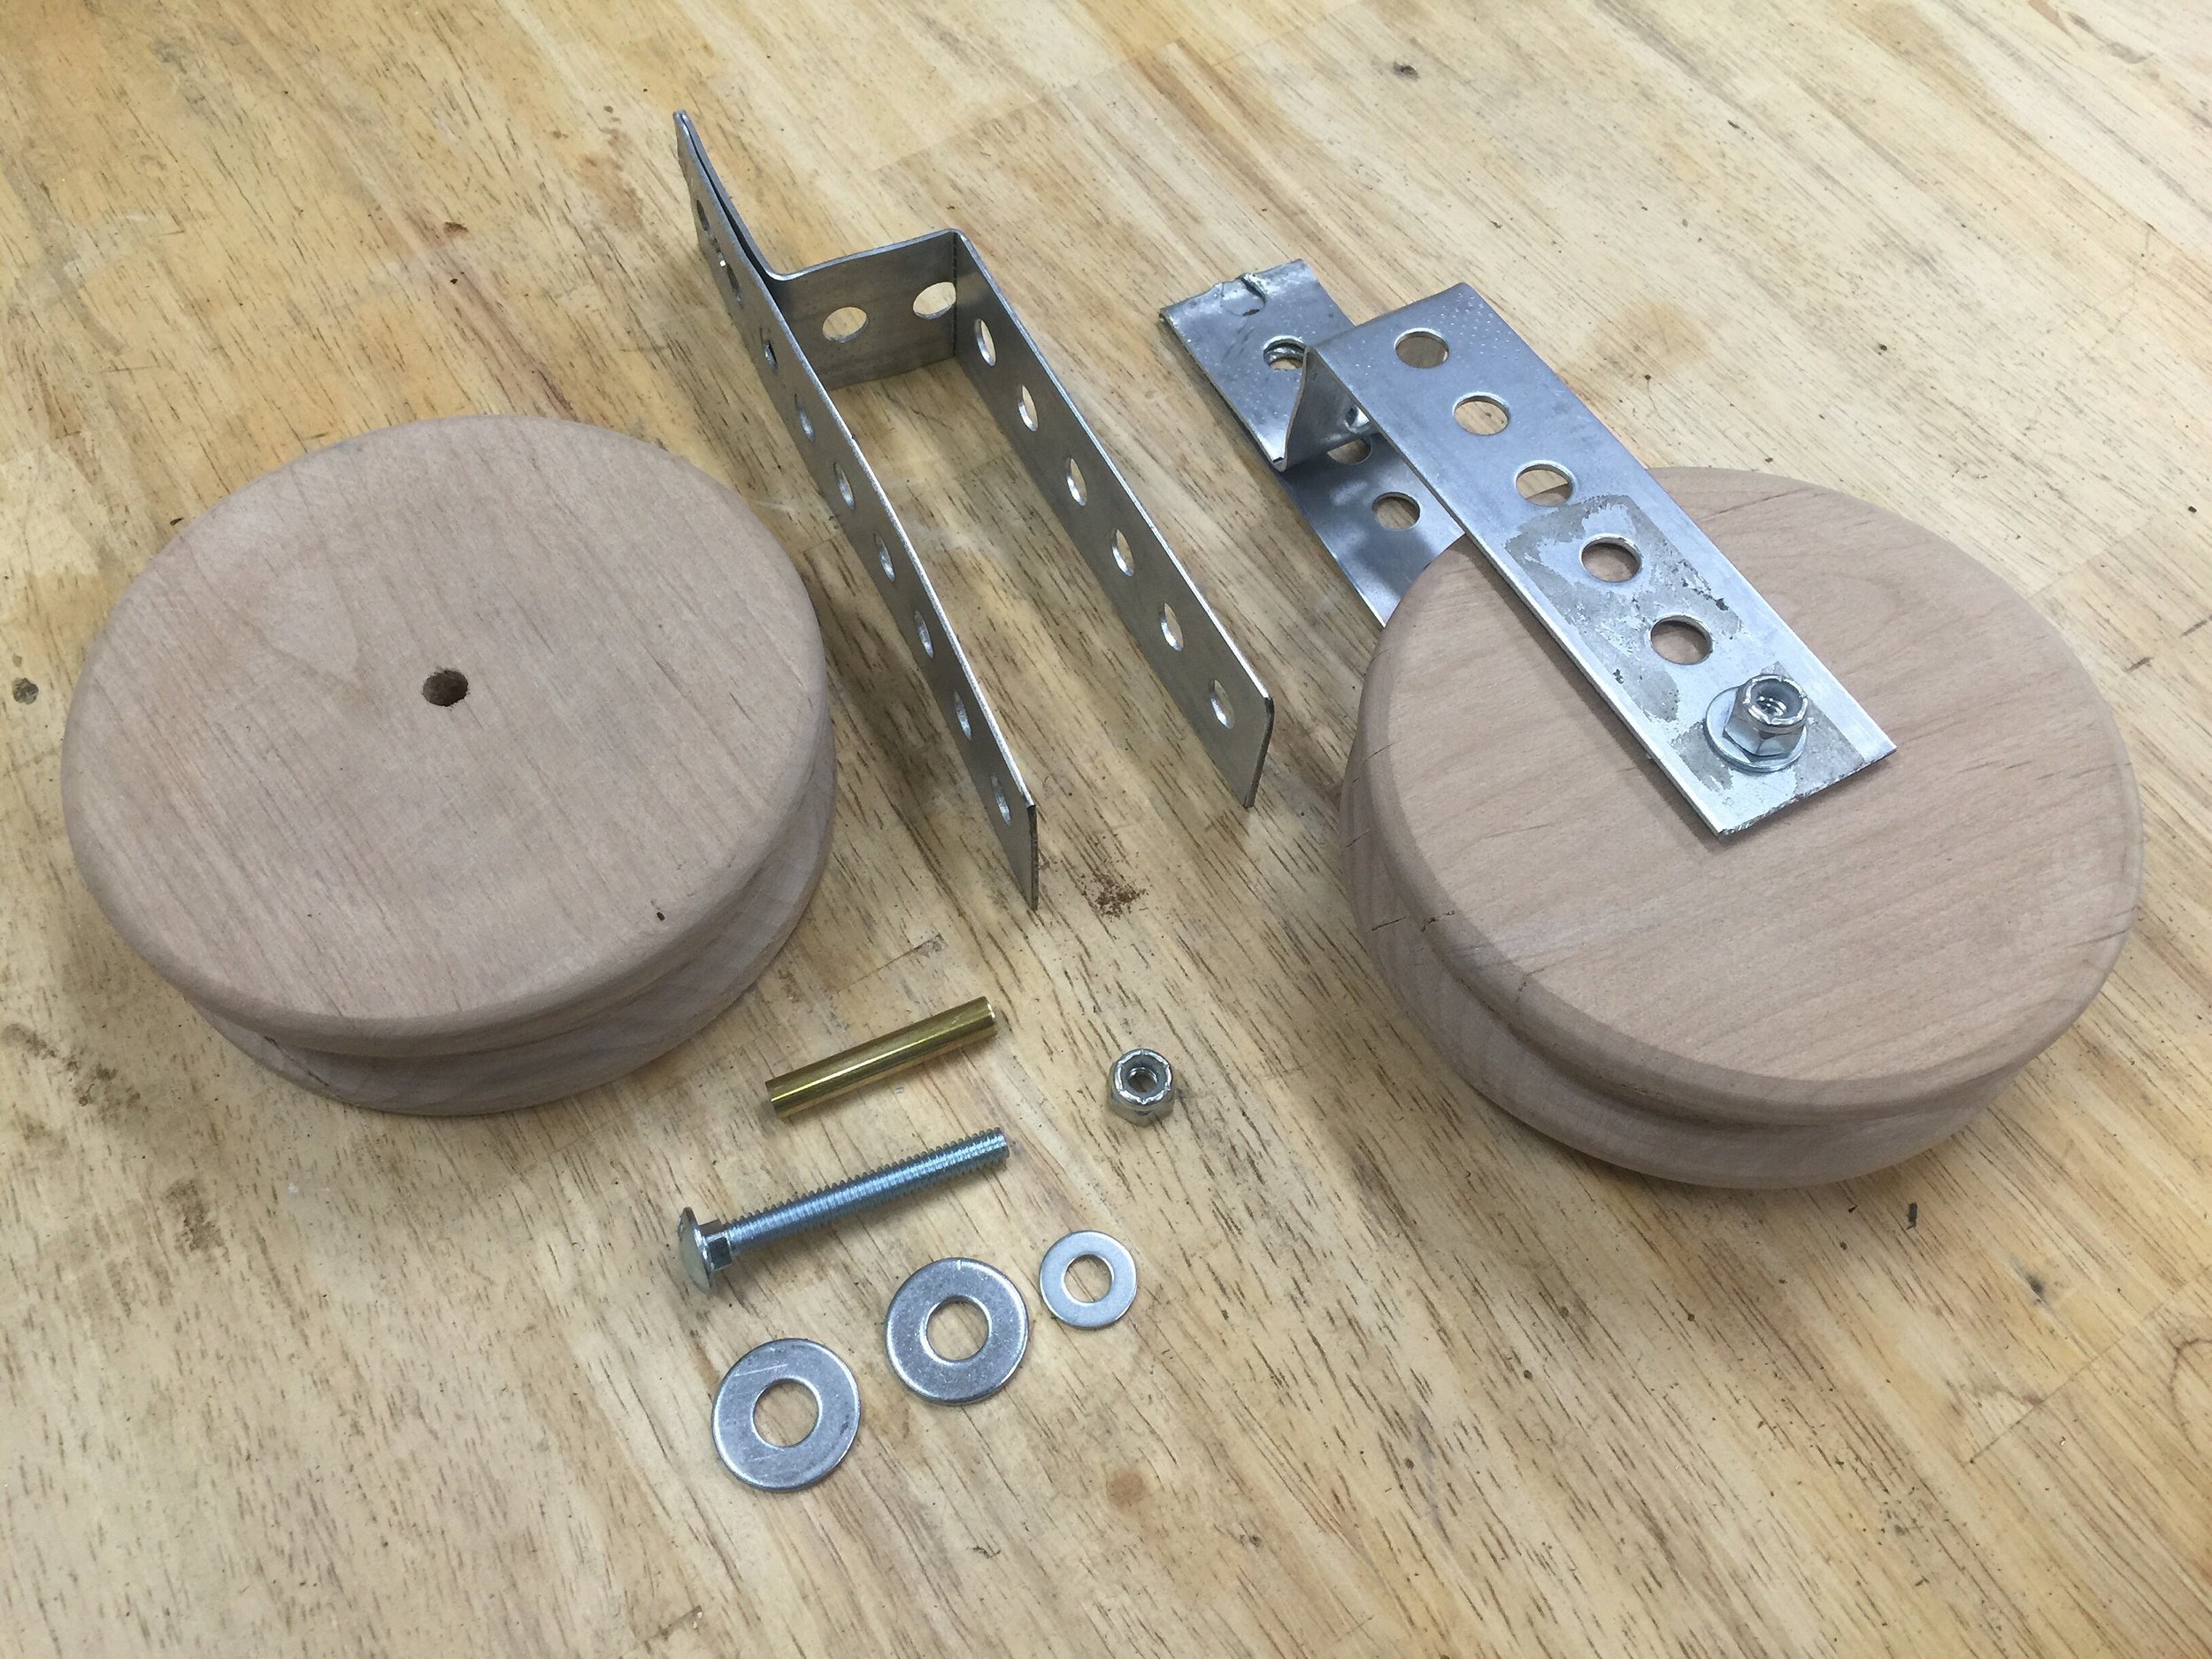 [/one_half_last]To assist in sliding this large weight up the wall I picked up two heavy pieces of steel, both weighing close to 30 pounds each. I figured that I didn't want them to weigh more than the XCarve but just wanted to offset the weight a little. To assist with the counterweight portion of this project I turned a couple of pulleys from scrap alder and made brackets from random stuff I had lying around. I wanted the pulleys to move freely inside the brackets so I used some brass tubes from pen kits as make shift bearings.
 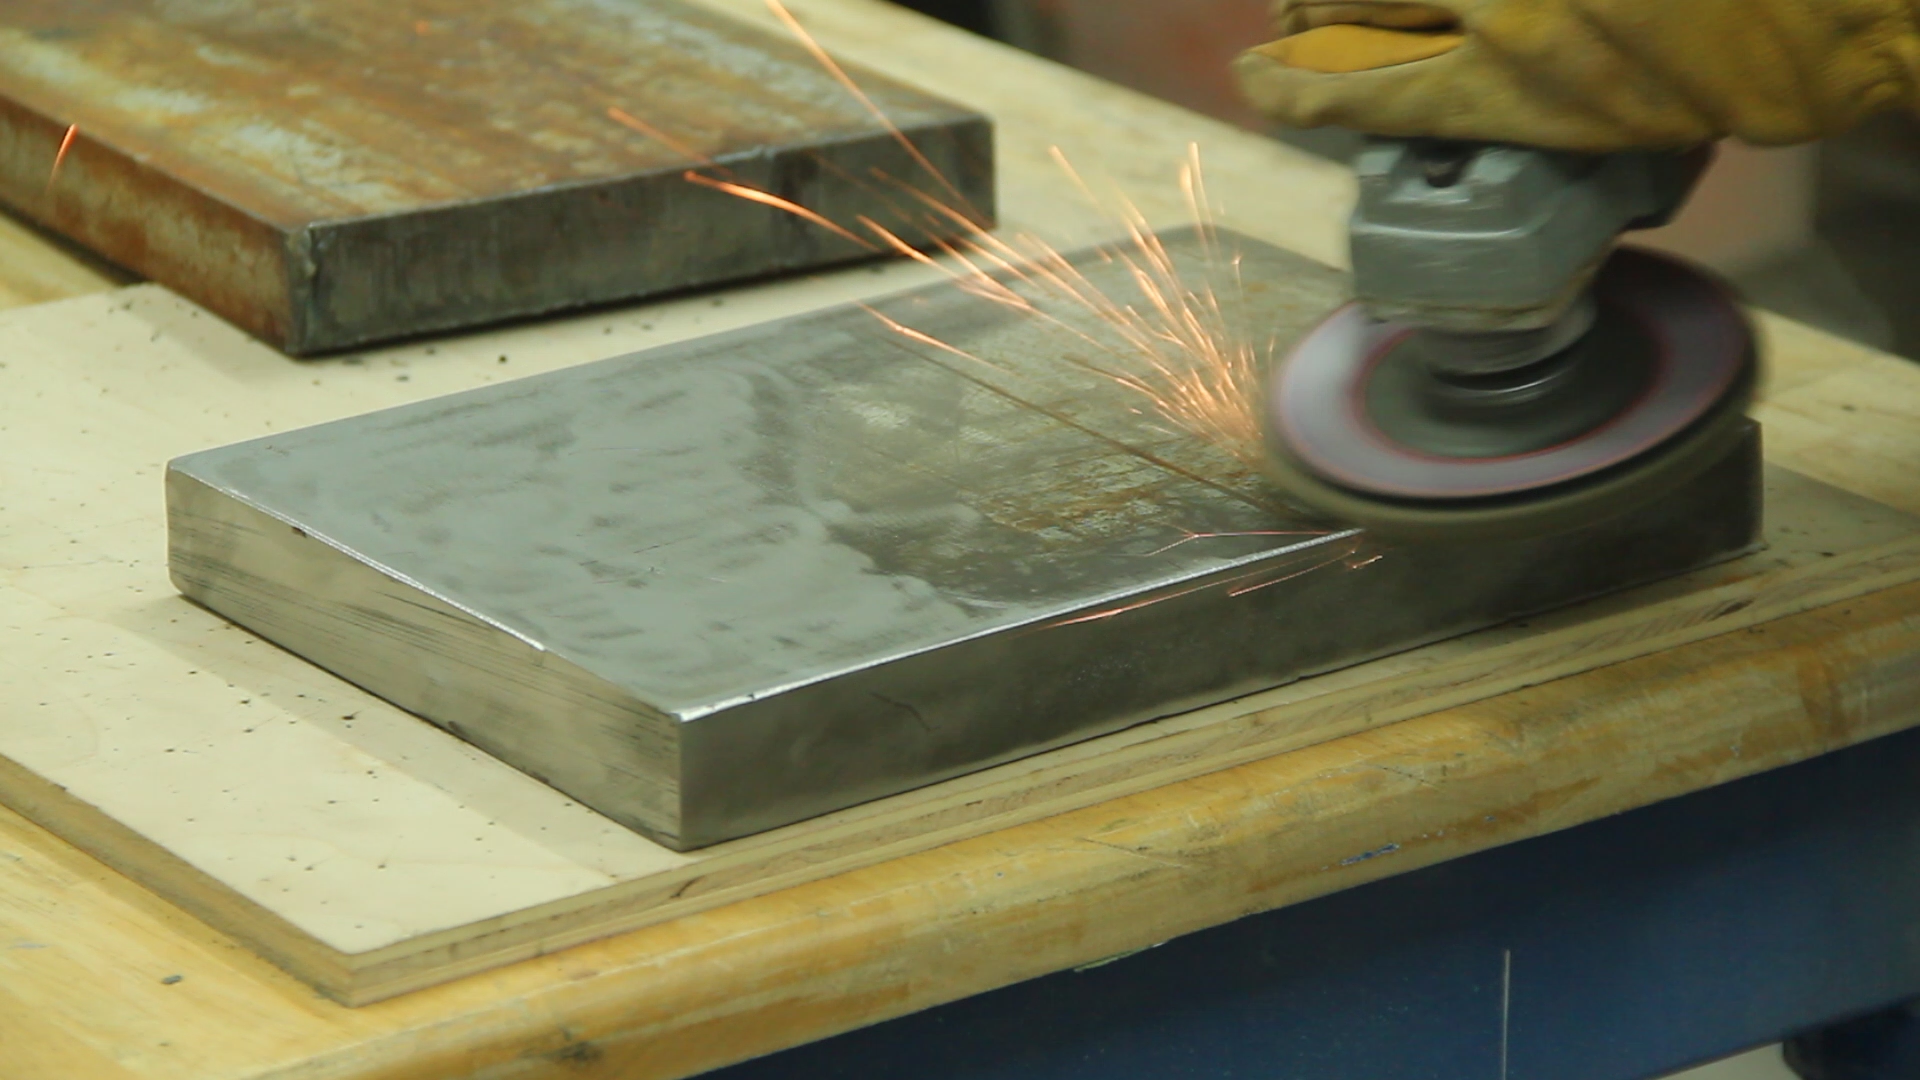 After welding some tabs to the 30 pound weights they got cleaned up and waxed just like the rest of the things that had to slide or move.After tying heavy-duty nylon rope to the weights, winding it through the make shift pulleys and securing it to the sliding/tilting mechanism with a bowline knot, I found that I could barely even get the XCarve and table down half way. I took the weights back off and weighed everything verifying that the combined weight of the steel counterweights didn't even come close to the weight of the XCarve let alone XCarve and table.
 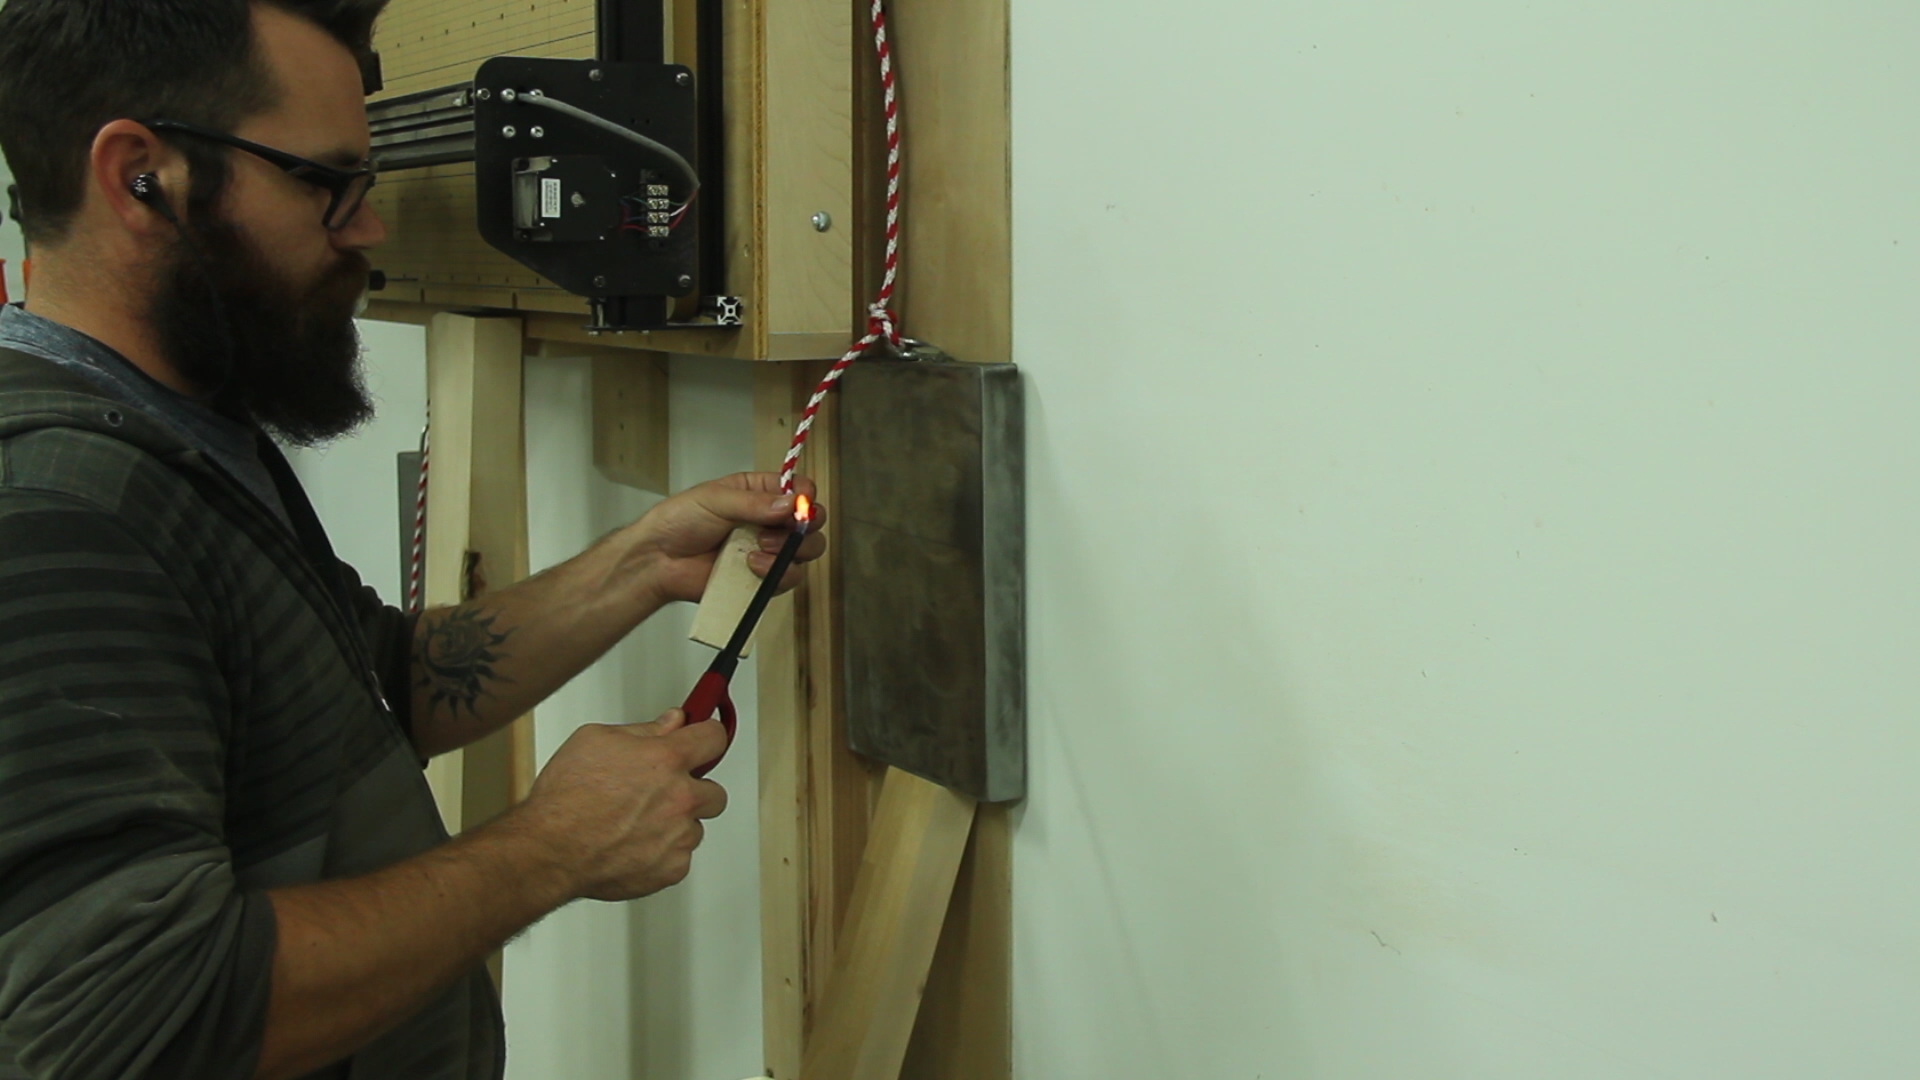 I figured I must have some friction and weird physics going on so I asked a neighbor to cut 1/3 of each weight of using his oxy acetylene torch. After re-assembly I found that it was still not enough and watched the weights get pulled into the rail's causing large amounts of resistance. I re-located the hooks on the weights to the inside corner and trimmed off another portion getting just enough to make the whole contraption work.Now that the entire project is done I can slide up the XCarve up and out of the way when not in use and put all of that floor space to good use. As an added bonus, when it's on the wall it is still highly visible and adds to the awesomeness of my shop. When I have a project that requires the CNC I simply need to slide the table down, pop out the legs and let it get to work.See the Slide Away Counterweight Table in its lowered position:
 Check out the Slide Away Counterweight Table in it's raised position:
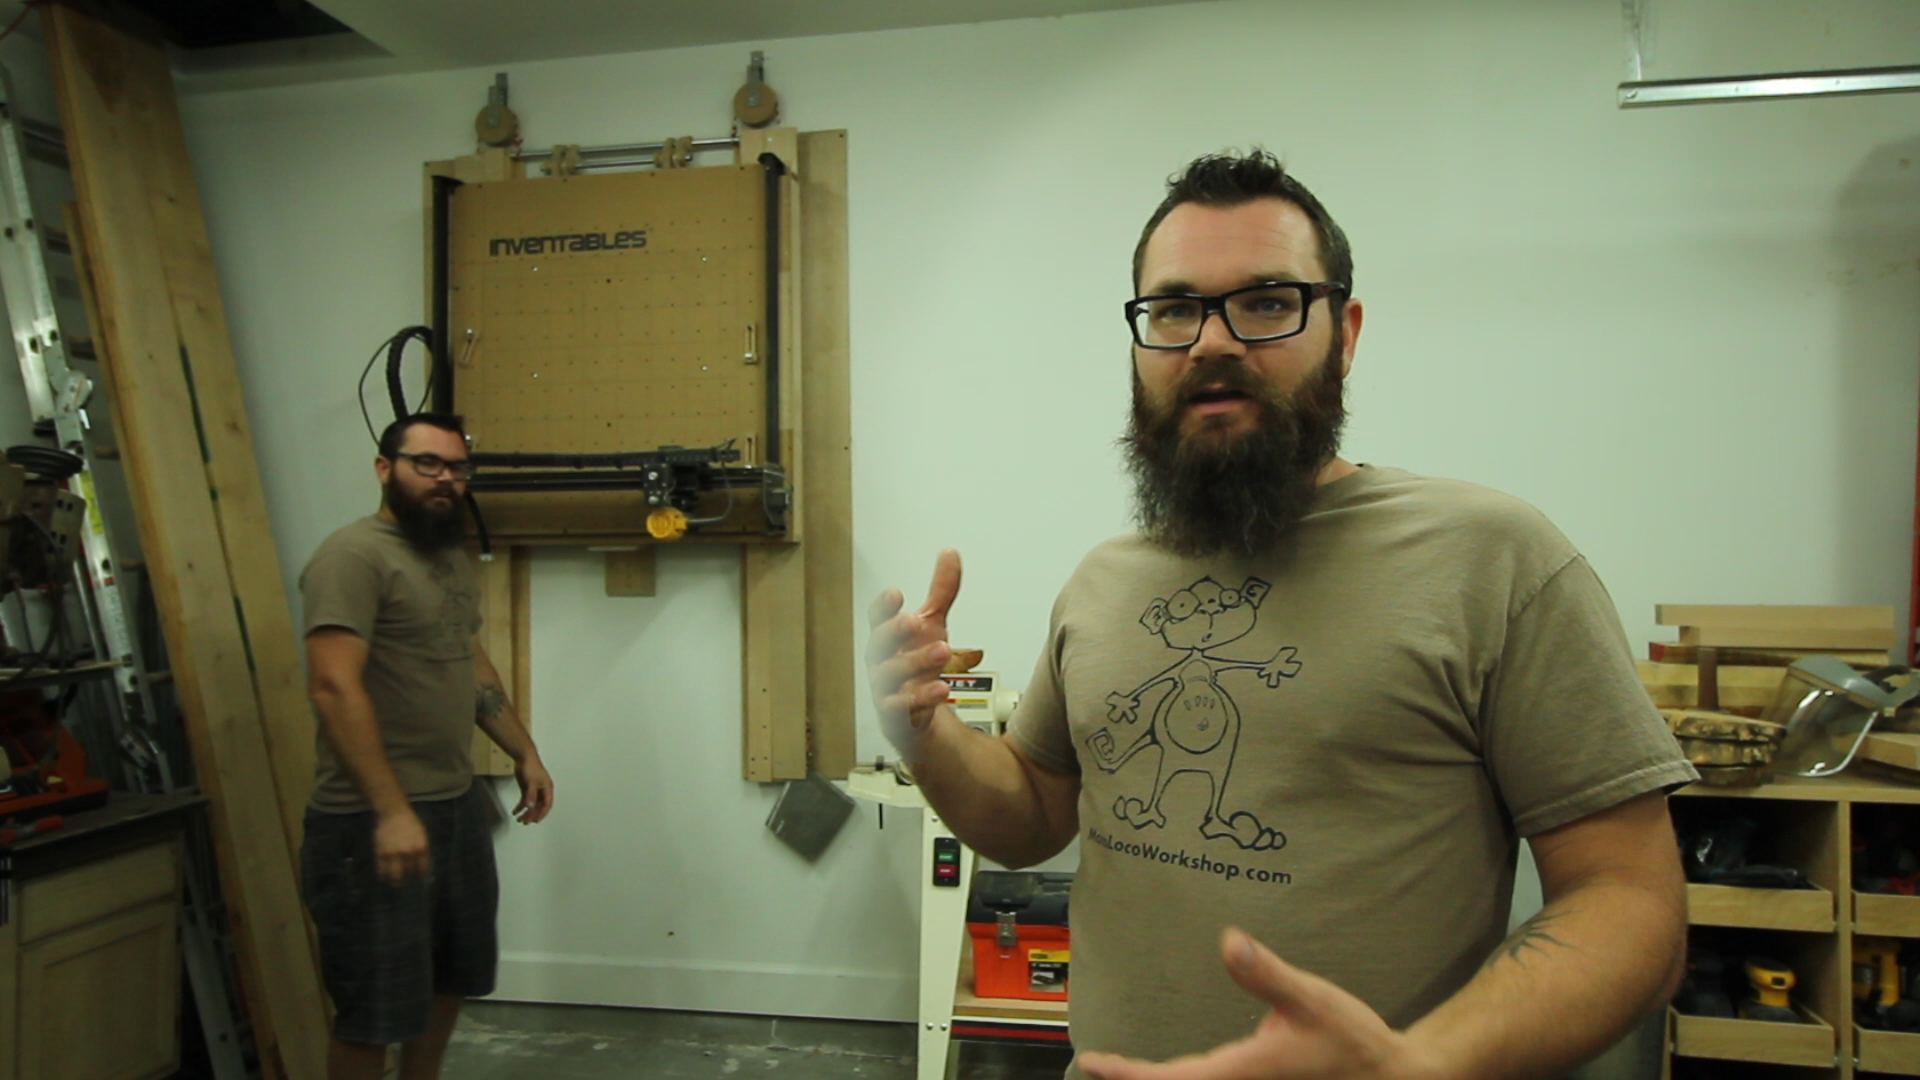 Would I call this project a success? Well.. I guess but I'm not really pleased with the overall outcome. It works but there's a lot of things screwed to my wall and it was a pretty involved project. I actually started this before I started growing a beard and let LOTS of projects get in the way. I also recently saw a simple folding wall mounted table the DIY Tyler put on his wall. It's simple, saves your floor space and works. If I were to re-do this project, I think I would choose DIY Tyler's route.