
How to Make a Vacuum Chamber

Why a vacuum chamber?
Vacuum chambers can be used for many things but three primary uses come to mind: stabilizing wood, degassing silicone and Awesome experiments. There are many other uses but the only three I will probably ever do so I'll just stick with those.Stabilizing wood is the process of turning soft, brittle and otherwise unusable wood into something that is very hard. Degassing silicone is the process of removing bubbles out of a silicone mold which can also be done with any soft casting material but it needs to be something that has a long cure time as the process can take a while. Harder & faster casting materials like resin should be cast in a pressure pot. (Future article.)
Check out the How-To video:If you're not already subscribed, why not!
Shopping List
For this build, you'll need a chamber, multiple fittings, a gauge and a vacuum pump. (Other than the chamber, silicone sheet & vacuum pump, the things on this list are more for reference. For everything else, I suggest skipping to the cheap & easy section.)
Chamber
This 1.5-gallon glass jar is the container used for this article but there are plenty of options out there. You'll want to consider the risks you're willing to take as it can be dangerous having a vacuum chamber implode. I picked the thick glass container because I wanted to clearly see and film what was happening from all angles but I do take precautions to protect myself just in case. You might also consider an aluminum pot like this 12-quart one but that would require a different type of lid like this piece of acrylic which can get fairly costly.
Fittings & Guage for the Lid
- 1/4" Brass tee with 1/4" Male
- 1/4" NPT Male Brass ball valve
- 3/16" Brass hose barb with 1/4" NPT Male
- Oil Filled Vacuum Pressure Gauge
- 2x 1/4" NPT Nut
- Seal - 12x12-inch Silicone Sheet
Vacuum Pump
- Single Stage Vacuum Pump (There are plenty to pick from, this is just the one I chose.)
- Vacuum Pump Adapter (1/4" SAE Female to 1/4" NPT Male)
- 3/16" Brass hose barb with 1/4" NPT Male
- OPTIONS: Quick disconnect with a 1/4" female coupler & a 1/4" female plug OR opt out of a disconnect and get a 1/4" NPT double sided female coupler.
Misc
- 3/16" ID PVC Tubing (You really only need a few feet but with Amazon Prime, this ends up being cheaper.)
- Teflon Tape
The above links are more for reference because you would be crazy to click on all of those and buy each part individually. You can pick up most of those at your local hardware store for a LOT cheaper. Harbor Freight is also a good supply for NPT connections. The biggest thing you'll have a problem finding locally will be the 1/4" SAE female to 1/4" NTP male adapter.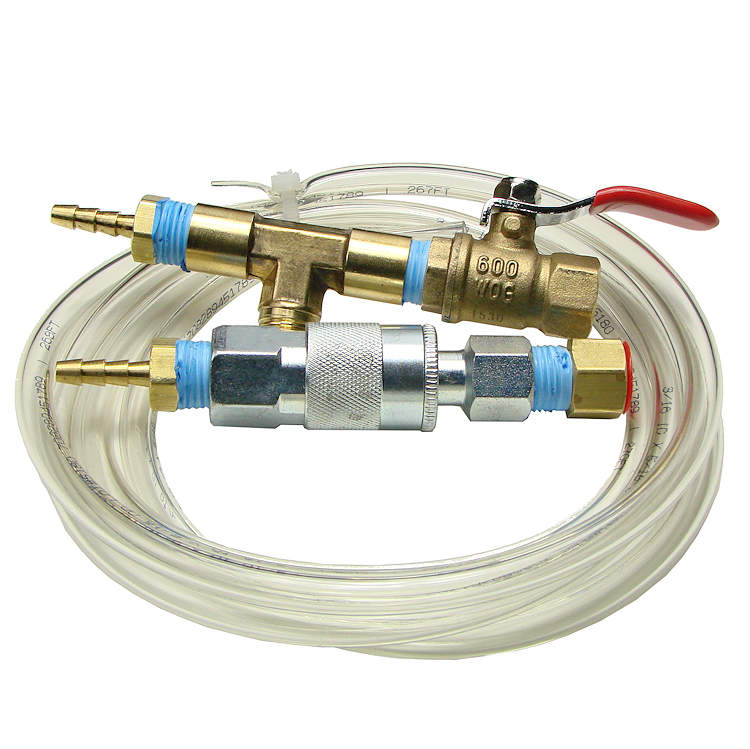
Go the Cheap & Easy Way!
If you want to go the cheaper route, get your chamber, seal, vacuum pump and then run over to turntex.com and get a complete chamber plumbing kit. (Not an affiliate, that's what I did.) You'll also need to pick up a vacuum gauge but he's got that too. You'll have to pay for shipping but after adding all those parts up on Amazon you'll save quite a bit of money. Seriously, you'll save TONS!
Prepare and Assemble
The lid will need two holes, one for the vacuum pump inlet and one for the gauge. Both should be about 9/16ths of an inch which should barely fit the brass fittings. Make sure to leave enough room between the two holes to let the handle on the ball valve rotate.To securely seal the inlet & gauge to the lid, you can make a seal out of the silicone sheet from the supplies list or epoxy the brass nuts to the underside of the lid. If you want to go the epoxy route, use a little sandpaper (220-grit if you have it) to help roughen up the area. It would also be best to clean off the area with a solvent to help the two surfaces bond together. Feed the brass fittings through the holes, loosely tighten them in the nuts and carefully apply epoxy around the nut and lid taking care to keep it off of the brass tee and gauge. (You may have to do this in multiple applications.)[gallery type="rectangular" ids="1816,1820,1818,1823"]After measuring the top of your chamber and the inside diameter of your lid, cut a seal out from the silicone sheet large enough to completely cover the top of the chamber while fitting inside the lid snugly. If your lid isn't concave, you might get away with using this seal for the vacuum pump inlet and gauge, otherwise, you'll need to cut out the center of the seal to make room. If your lid has sides, you'll want to double-check that they don't interfere with getting a proper seal. If necessary, you may need to trim off a small section of the lid to ensure a proper fit. My preferred method is a grinder with a cut-off wheel but many other tools can be used for the job. After the fact, make sure all sharp edges are cleaned up so you don't end up bleeding during experimentation time.
 If you didn't get the chamber plumbing kit, you'll need to assemble all of the fittings and adapters making sure to apply Teflon tape to all threaded areas. It would probably be easier to refer to the picture on the right for how the parts are assembled but for documentation sakes, I'll spell it out. The gauge goes into the lid as expected and the inlet section of the lid consists of the brass tee threaded into the lid with a brass valve on one side and the barb adapter on the other. The hose connects the inlet to the pump where from top to bottom it goes barb adapter, 1/4" female plug, 1/4" female coupler, vacuum pump adapter, vacuum pump. Yes yes... all very confusing. Look at the picture and it all makes sense.
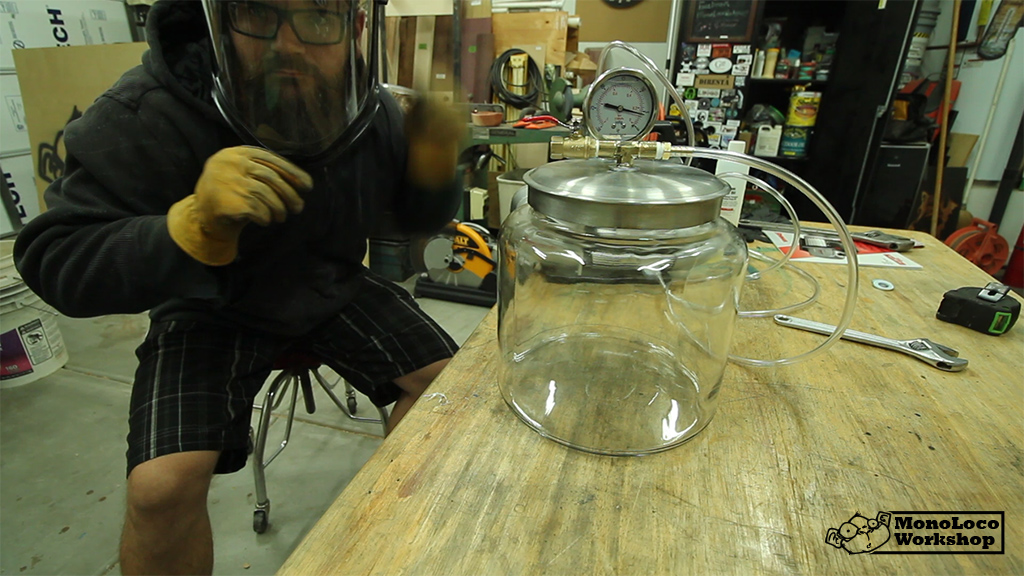 At this point, everything should be fully connected, sealed and good to go. Depending on your level of concern for your safety, before turning it on you may want to take some precautions by suiting up in safety gear and/or placing a barrier between you and the chamber. (At least for the first time.) It would also be smart to read up on the function of your vacuum pump to ensure you have the right amount of oil and you know the right way to turn on/off your pump as it's not always smart to turn off your pump when vacuum is applied depending on the type of pump.
Start Using
Stabilizing Wood
The process of stabilizing wood basically turns soft, brittle wood into something much heavier and harder. One of my upcoming articles will do a deep dive on stabilizing wood so I'll just give you the gist of the idea for now. Crappy wood is inserted into the vacuum chamber and weighed down. A stabilizing resin like Cactus Juice is poured in until the wood is fully submerged and covered with an extra inch or so of resin. All of the air is sucked out of the chamber and wood which can take hours. When most of the air has been evacuated from the wood, the chamber's seal is released causing the resin to be sucked back into the submerged wood which once again can take multiple hours. (I leave mine overnight.) The newly resin impregnated wood is removed from the container letting the extra resin drip off and then heated to 190-200° Fahrenheit which can take multiple hours for the internal temperatures to reach that high.[gallery type="thumbnails" columns="4" ids="1829,1828,1826,1825"]
Degassing Silicone & Other Casting Materials
There are two ways to take care of the bubbles in a casting material, one is the vacuum chamber and one is the pressure chamber. With both methods, the material is poured into a mold and put it in the chamber. In a vacuum chamber the air bubbles are slowly sucked out and in a pressure chamber, they are compressed to an almost microscopic size. The pressure chamber works great for fast curing hard materials like resin but with silicone, microscopic air bubbles would just re-inflate inside the silicone causing all sorts of issues. The vacuum chamber works great with silicone since it sucks out all of the air and the silicone cures slow enough for the vacuum process to complete. On the other hand, most resins start to cure within a few minutes meaning you will end up with a pretty messed up casting when it starts to cure as air is being pulled out.
Awesome Experiments
If your vacuum chamber needs are of the 3rd variety, you are probably in for a little more fun. There are tons of experiments to do with a vacuum chamber which can lead to endless hours of enjoyment. To get you started, you can inflate deflated balloons or rubber gloves, watch marshmallows expand and shrivel up, boil water without heat & make awesome shaving cream art. There are plenty more experiments out there so use your imagination.
Check out this video I did with my cousin Grant (A.K.A. The King of Random)
REFERENCE - What is YOUR Max Vacuum (Hg)
There are a lot of ways to measure a vacuum, the gauge used in this article measures a vacuum in inches of mercury or Hg. If you really want to understand it, check out the wiki article. The gauge ranges from 0-30 Hg where 0 is normal atmospheric pressure and 29.92Hg is a perfect vacuum at sea level. Depending on your elevation and temperature, your perfect maximum vacuum will vary. Where I live in Chandler AZ, the elevation is around 1214 and my maximum vacuum is 28.62Hg but in Salt Lake at an elevation of 4226, the max vacuum is near 25.67Hg.There is also a little brass plug at the top of the gauge that needs to temporarily be removed so the gauge can zero itself at your current elevation. If you watched closely in the video, you'll notice I didn't do that for the first clip while the vacuum was on and the gauge started around 5Hg.
Disclaimer
I just wanted to point out that this can be a dangerous project and that your safety is completely up to you. If you don't feel safe doing something, don't do it or take extra safety precautions. I've seen plenty of people make vacuum chambers out of pickle jars & acrylics and picked this glass jar because it is about twice as thick as a glass pickle jar. I can not guarantee the safety of the glass jar I picked and even if it does hold up, you could have something inside slip and shatter it while under pressure. So I guess what I'm saying is to just BE SAFE!